Introduction
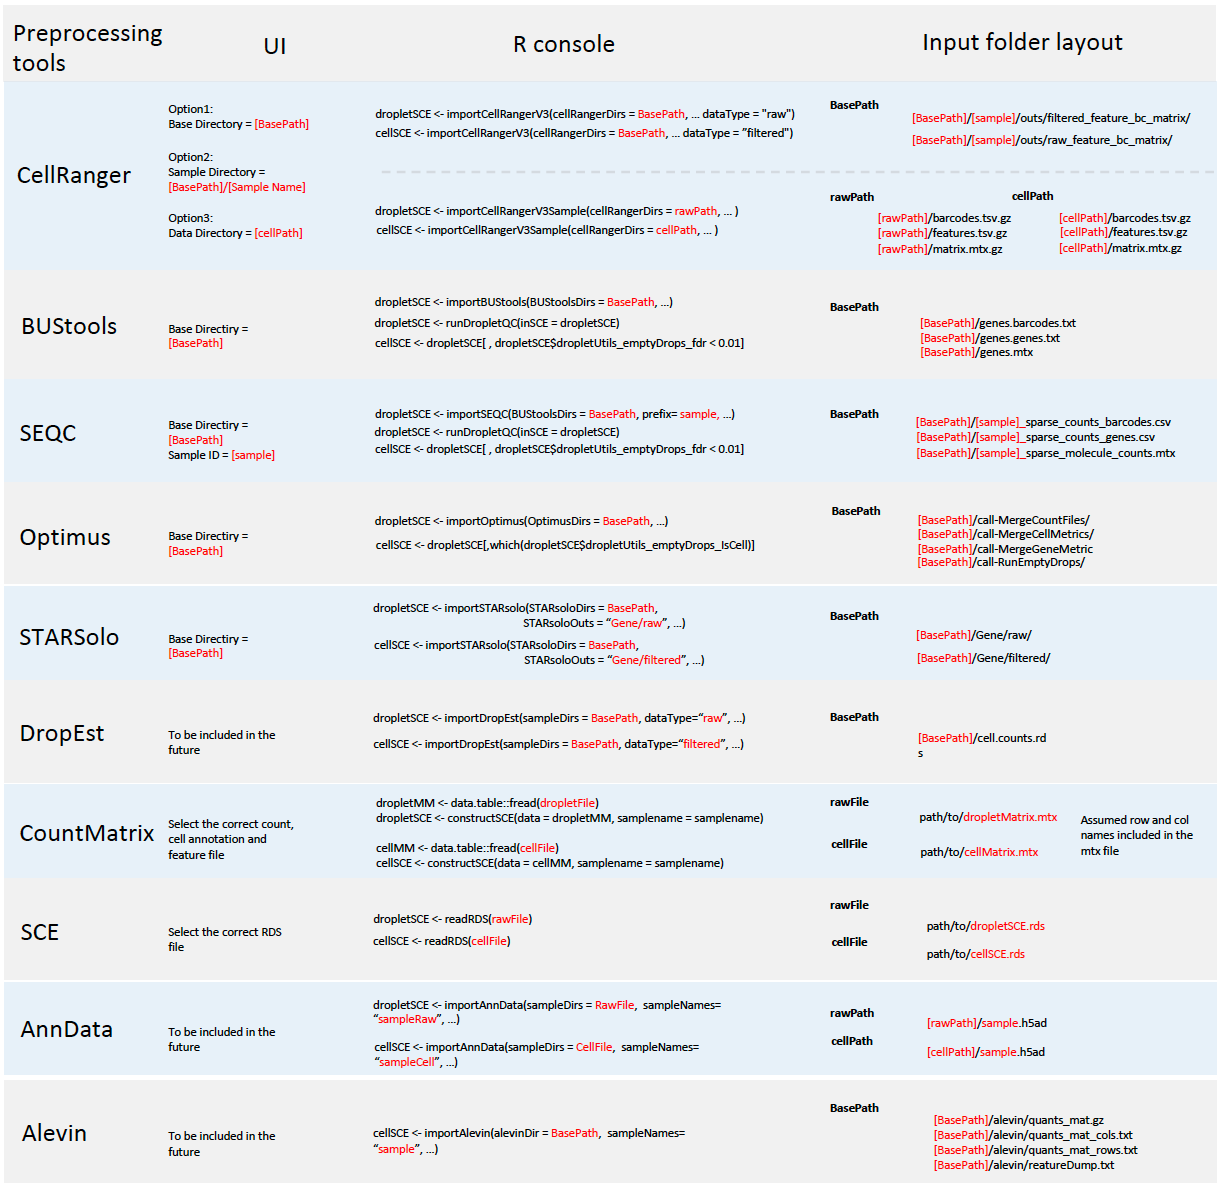
Single Cell ToolKit (singleCellTK, SCTK) enables importing data from the following pre-processing tools
In all cases, SCTK retains the standard output directory structure from the upstream tools.
Meanwhile, SCTK also supports importing raw count matrix, with metadata, stored in the following format
- Text files (.csv/.tsv)
- SingleCellExperiment object saved in RDS file
- AnnData object saved in hdf5 file
A chart at the bottom of this documentation summarizes the expected directory structure of the input data, for each type of data source.
To view detailed instructions on how to import data, please select, from the tabs below, “Interactive Analysis” for importing data into the Shiny application, or “Console Analysis” for importing into R environment via R console.
Workflow Guide
Introduction
This page is the landing page of the SCTK UI application. Here SCTK allows users to import multiple datasets at once, and the datasets can be in various forms, as listed above. SCTK also provides online example datasets.
Generally, the UI contains mainly two sections for importing and another section for data summary. Through the first section, users can choose the type of a single data source and specify the location of the data from this single source. A table in the second section summarizes files and samples that are specified from all sources. To finally import all samples into one dataset, clicking on the “import” button right below this table. After successfully importing the dataset, a summary table together with some setting options will be shown in the third section.
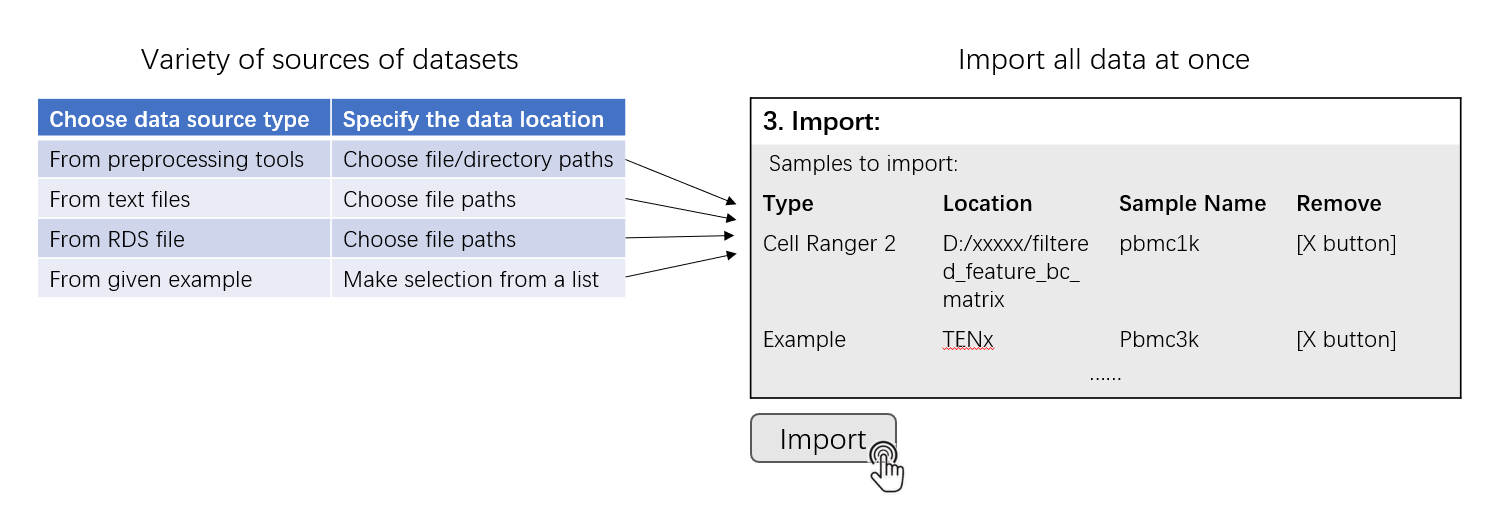
1. Add sample to import
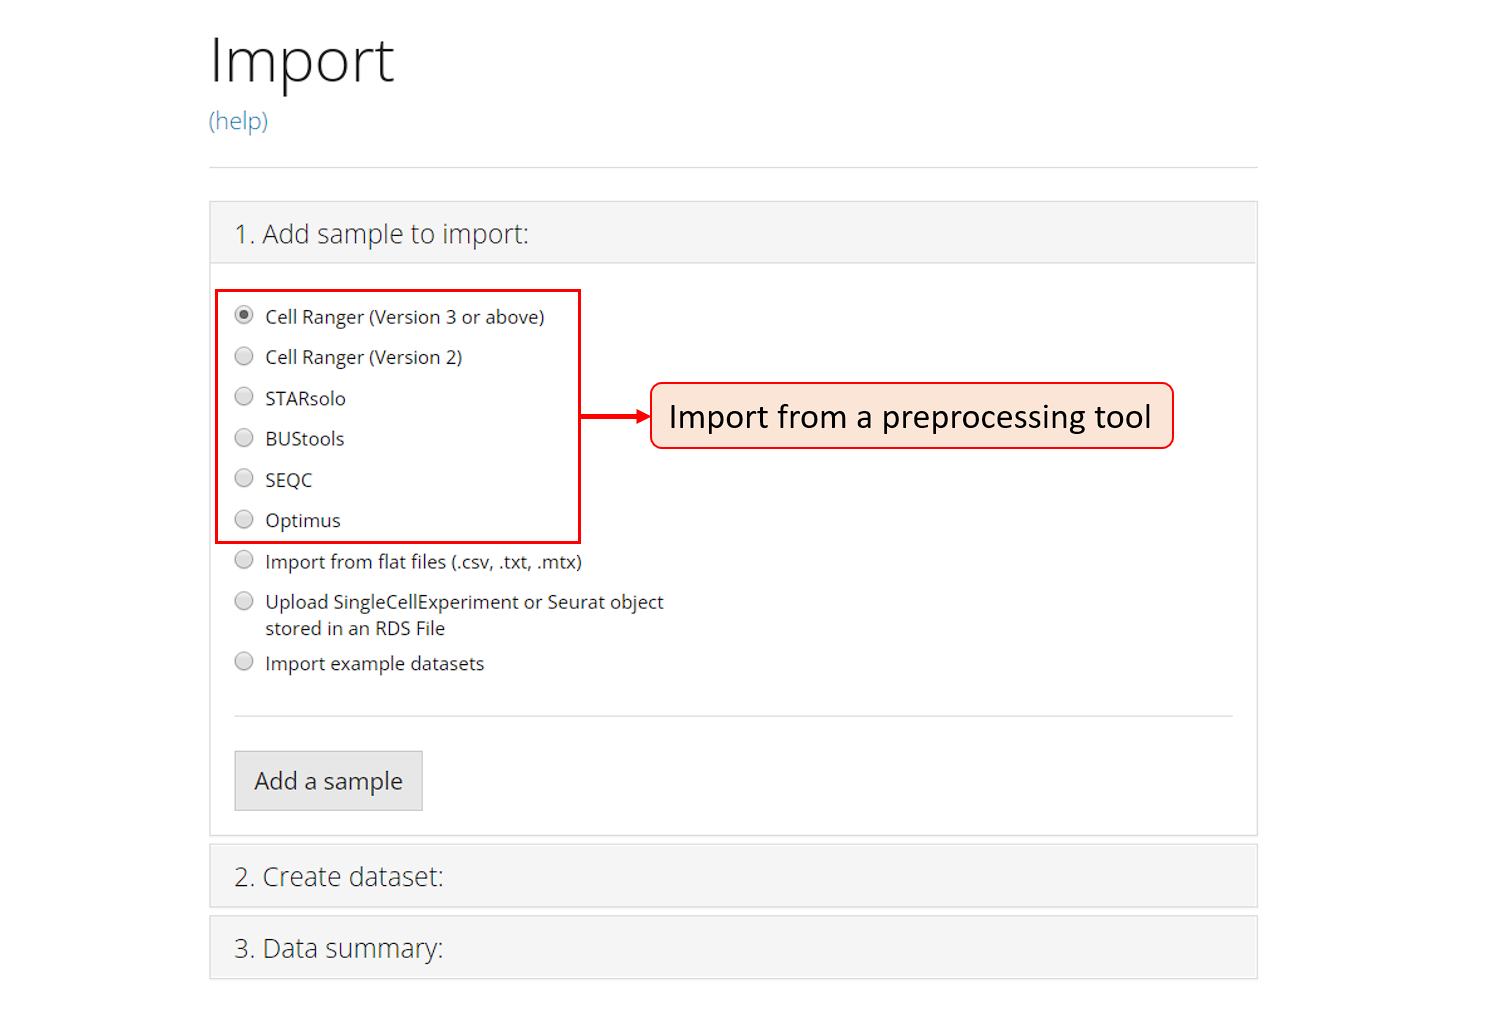
The first section introduced above is embedded in the the collapse box “1. Add sample to import”. For a single source of data, users need to choose one option from the radio buttons listed in the screenshot. The next step will depend on the option chosen.
Import from a preprocessing tool
The preprocessing tools that SCTK supports are circled in the screenshot above and the links for them are listed at the top of this documentation. To import the data processed by any one of these tools, select the corresponding radio botton, and click on button “Add a sample”. After this, a dialog modal will pop up with description that instructs you to select the directory that stores your data.
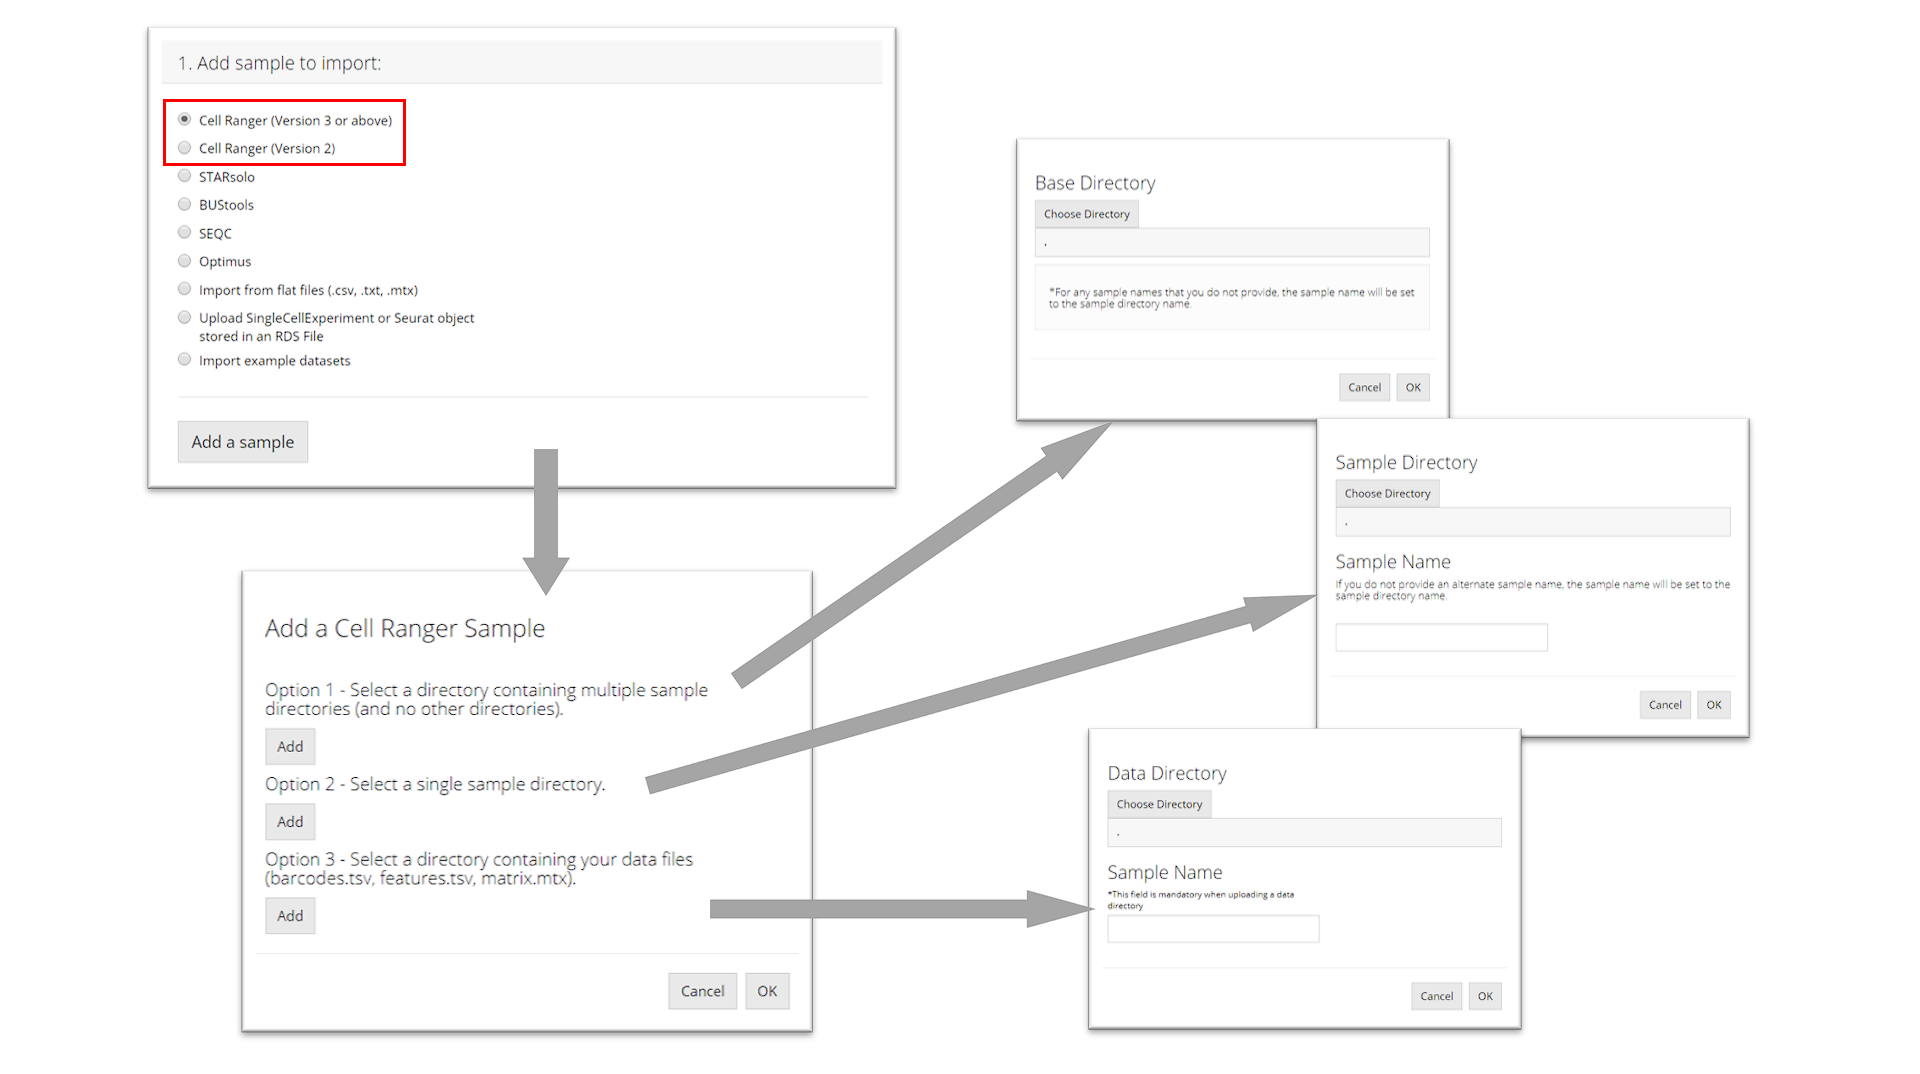
Cell Ranger
The import procedure for Cell Ranger versions 2 and 3 are the same. To import a Cell Ranger sample, the user must select how they would like to import the sample: select a base directory that holds multiple sample directories, select a single sample directory, or select a directory holding the data files for a sample. Depending on this selection, the user must then provide the apprpriate directory paths and sample names and then click “OK.”
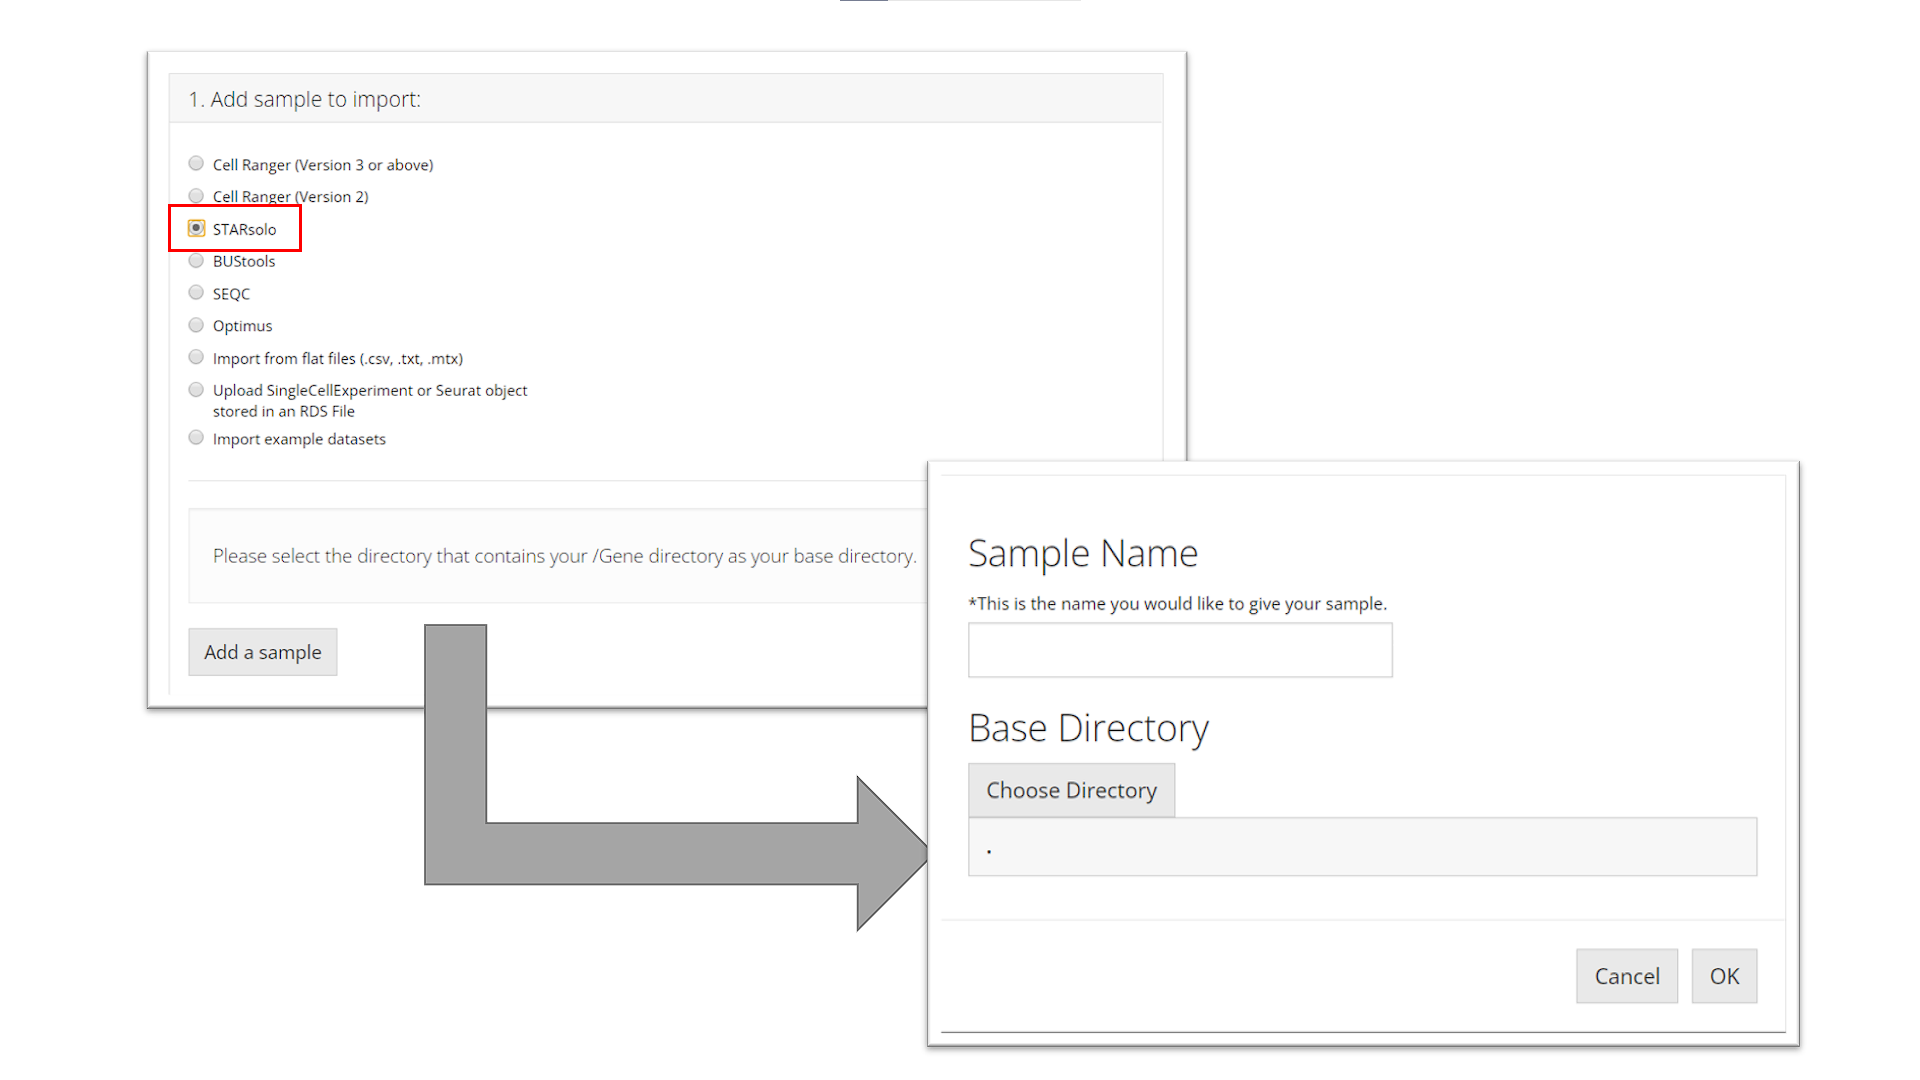
STARsolo
To import a STARsolo sample, the user must select the parent
directory of the "Gene/" directory for the
sample they want to import, name the sample, and click “OK.”
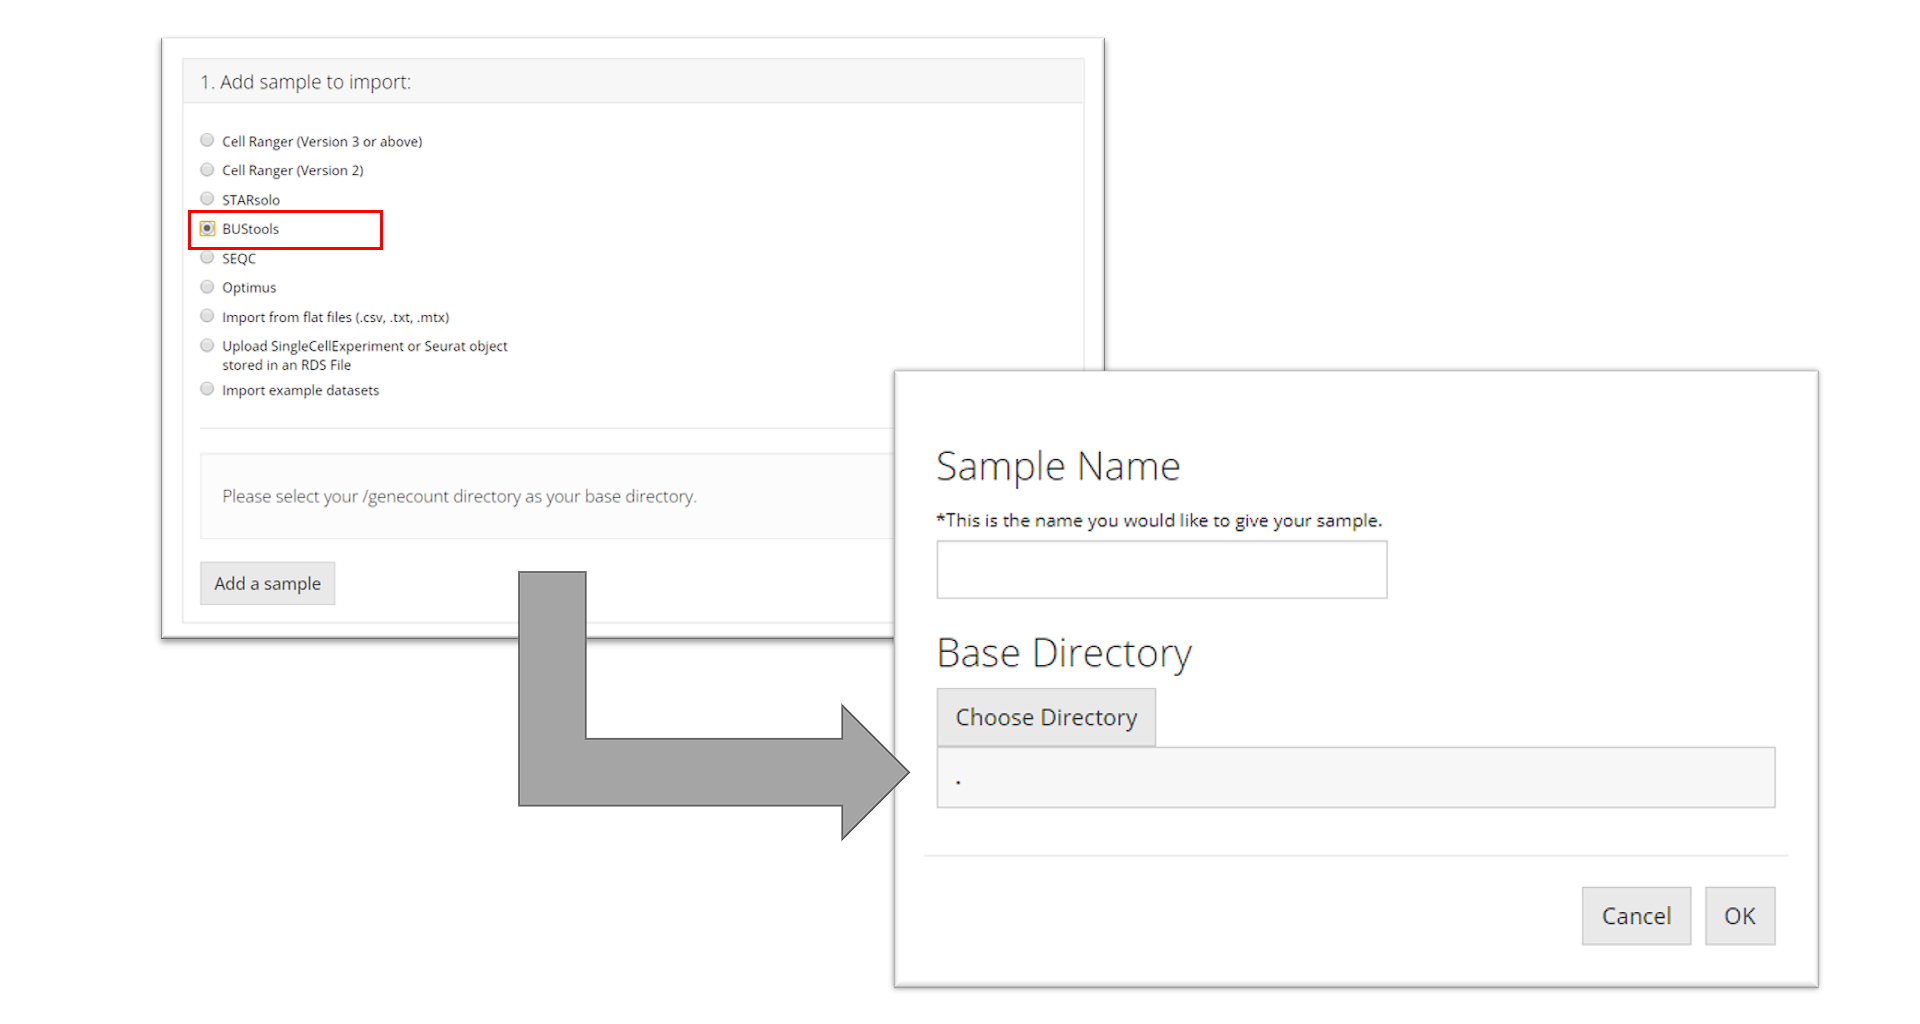
BUStools
To import a BUStools sample, the user must point to the
"genecount/" directory for the sample they
want to import, name the sample, and click “OK.”
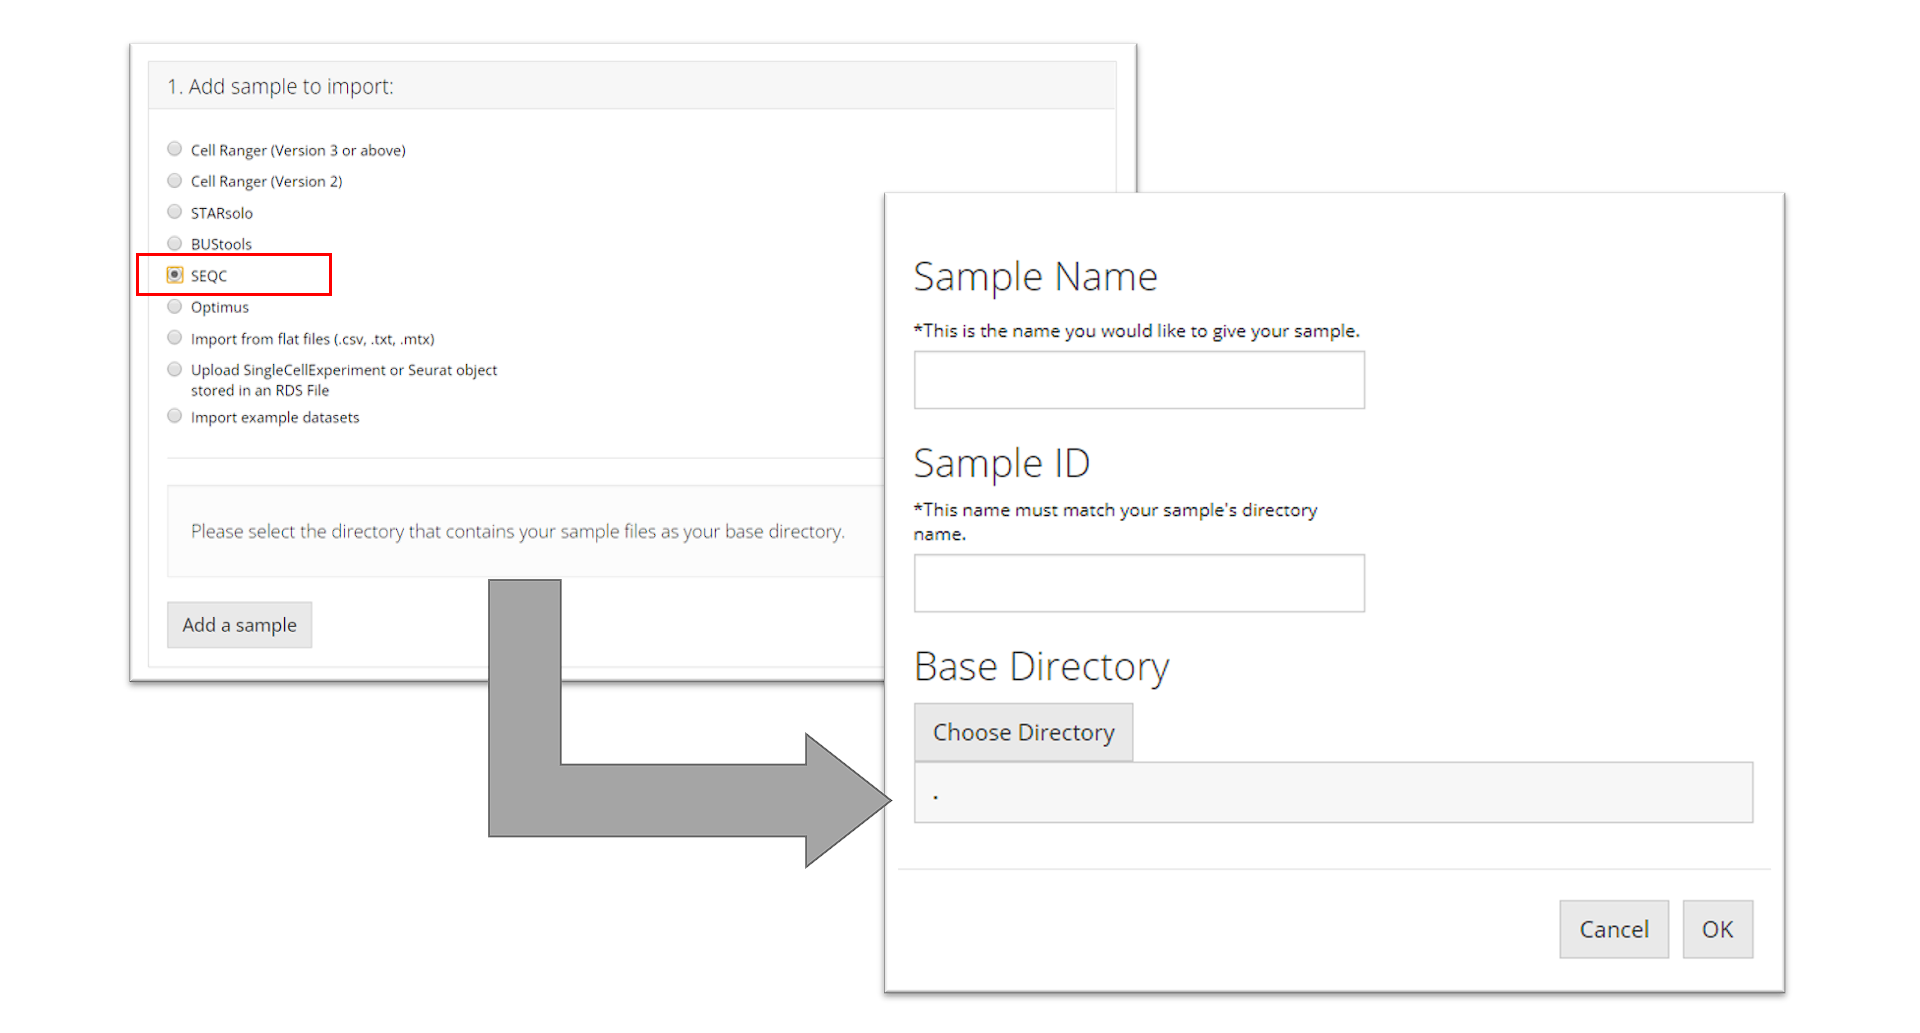
SEQC
To import a SEQC sample, the user must point to the directory that
contains the barcodes, gene, and matrix files for the
sample they want to import and name the sample. This tool additionally
needs the user to specify a “Sample ID” which is what
the name of the sample is as it appears in the names of its data files
(e.g. for a file called
"pbmc_1k_sparse_counts_barcodes.csv" the sample ID is
"pbmc_1k"). Then the user must click “OK.”
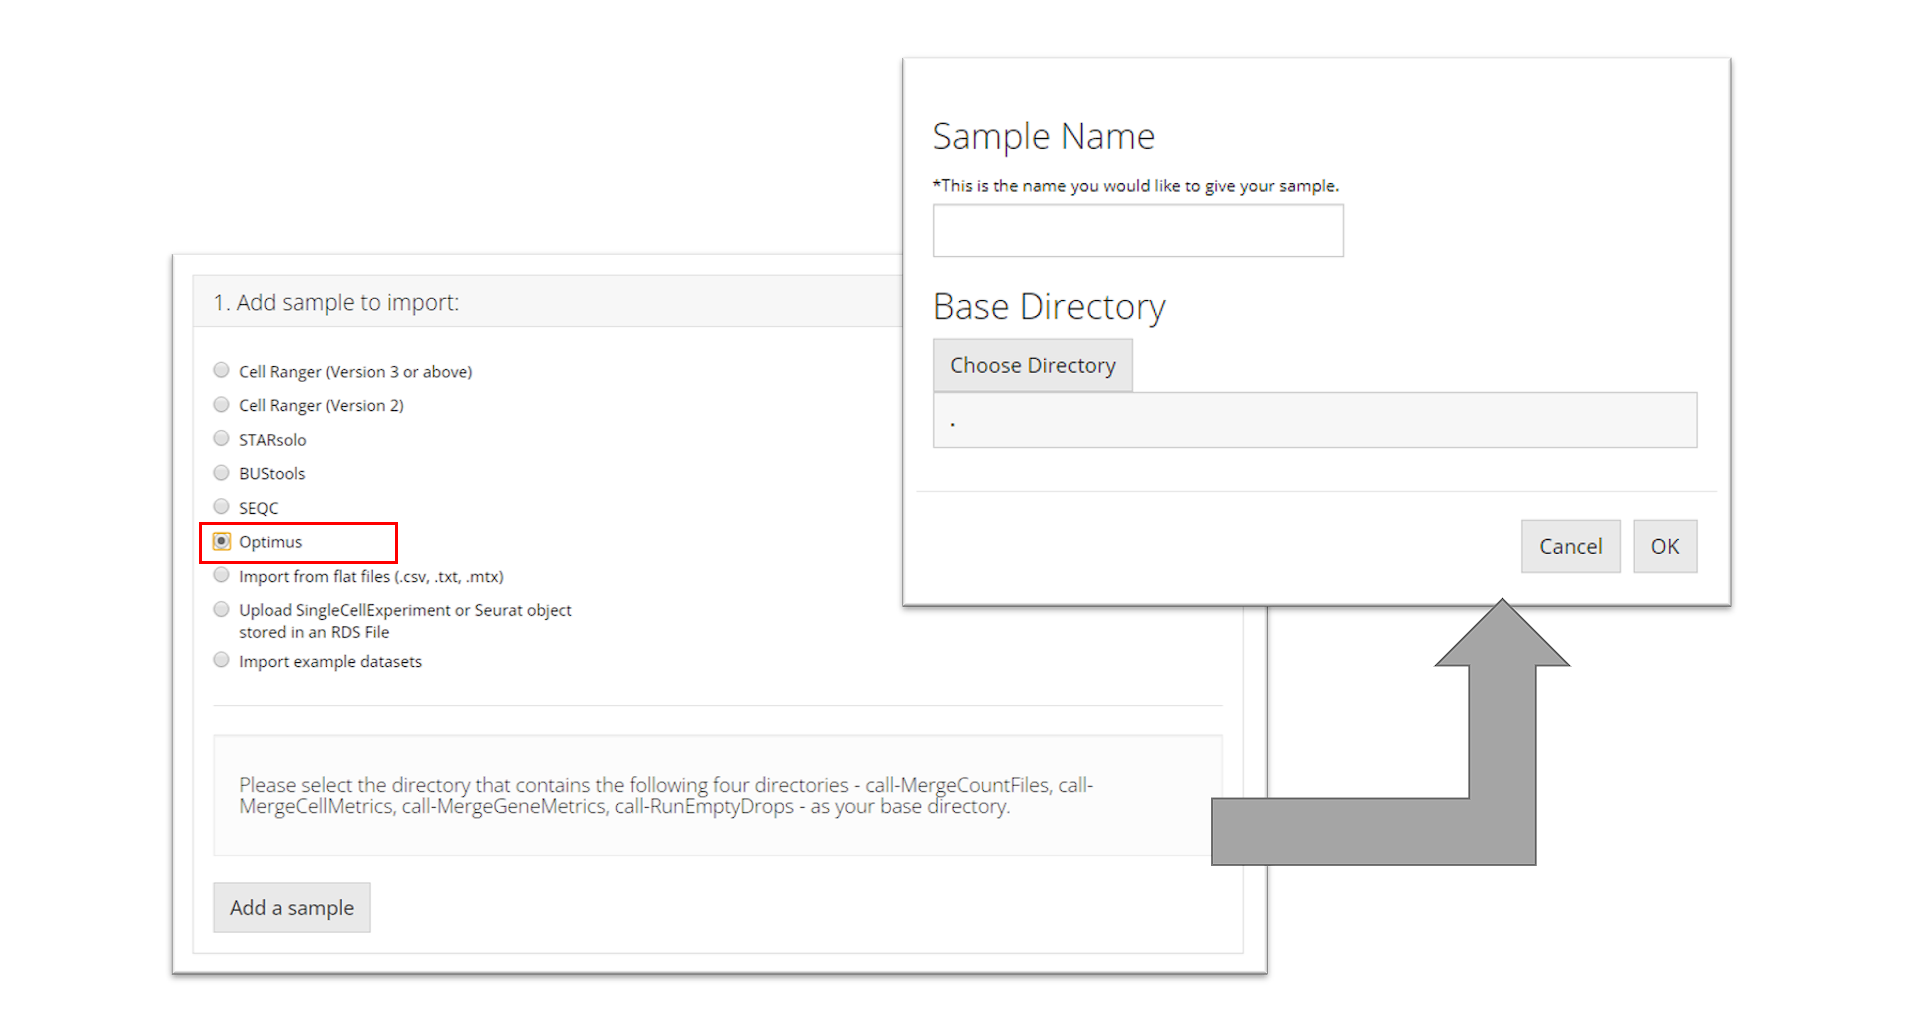
Optimus
To import an Optimus sample, the user must select the directory that
contains the following four directories for the sample they want to
import: "call-MergeCountFiles",
"call-MergeCellMetrics",
"call-MergeGeneMetrics",
"call-RunEmptyDrops". Then the user must
prove a sample name and click “OK.”
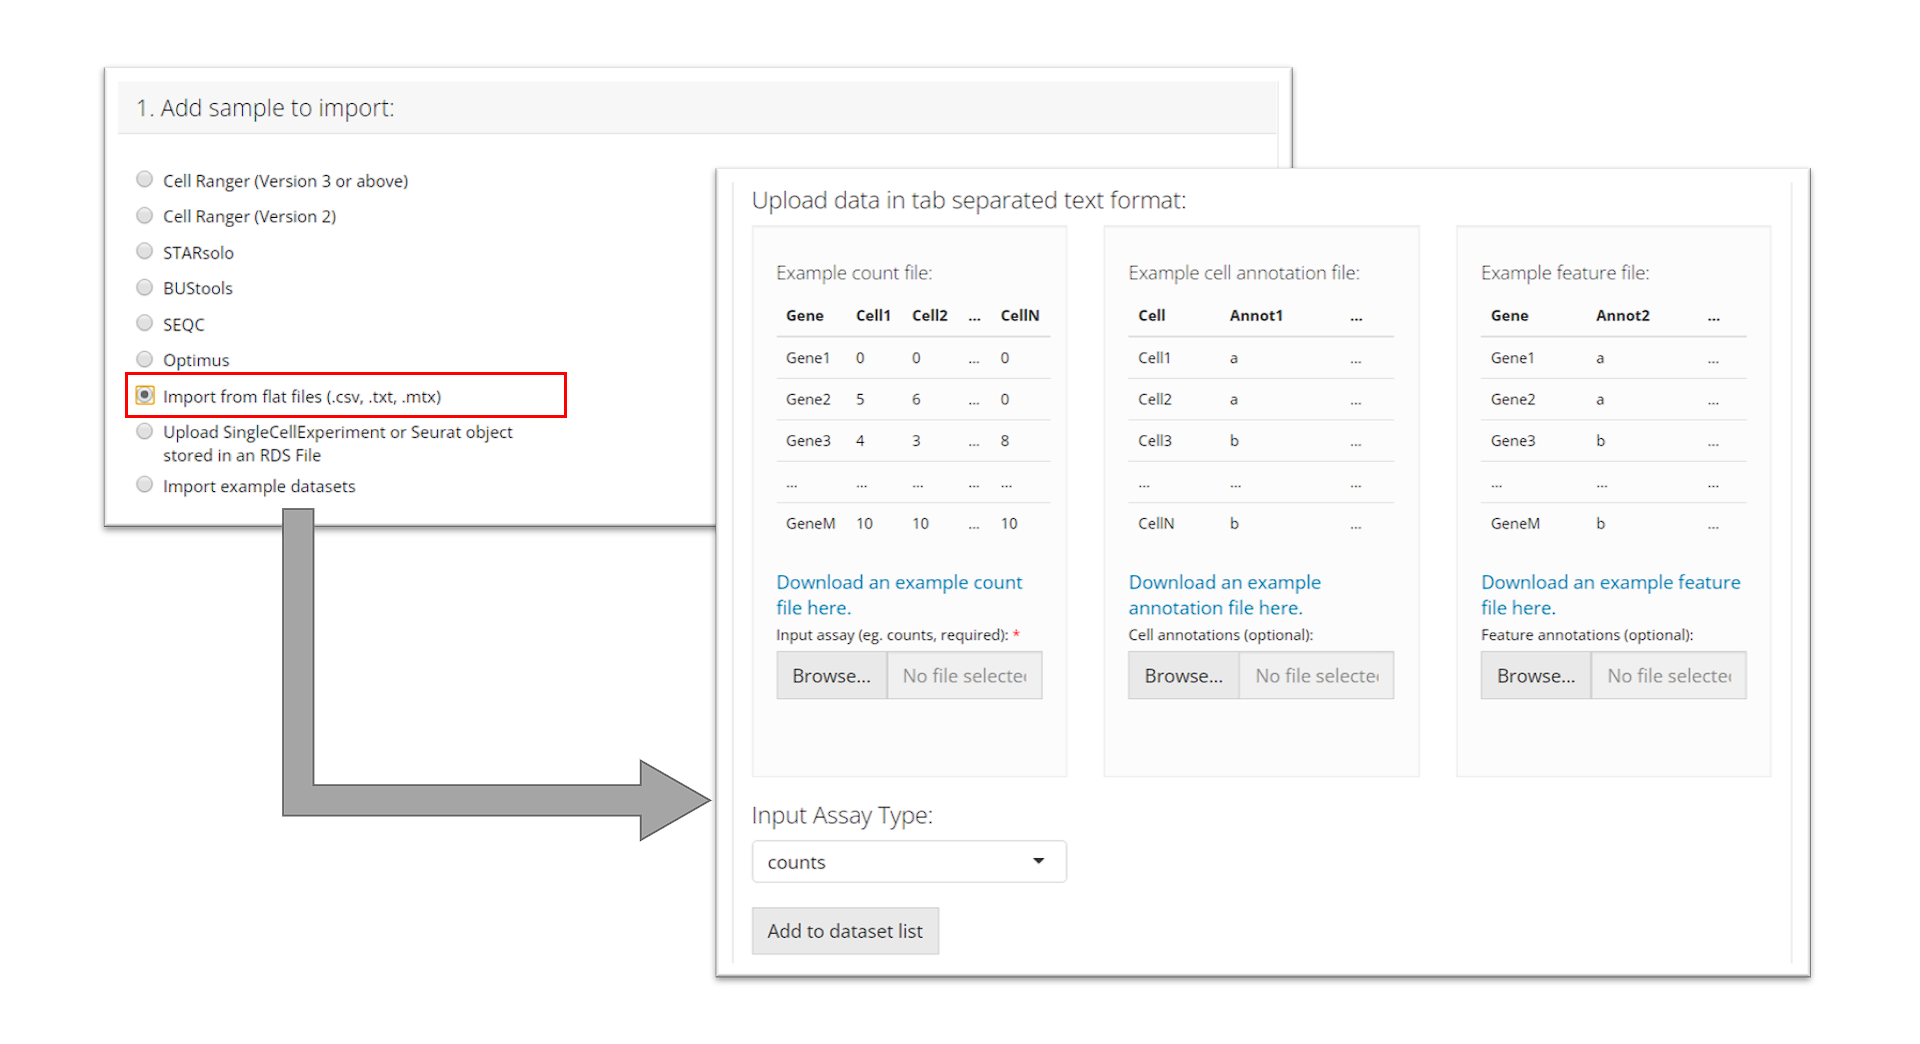
Flat files (.cvs, .tsv)
To import tab-separated data, the user must provide a counts
file (.csv or .tsv) and specify what type of input assay it is.
The user can optionally also provide cell annotation
and feature files (also .csv or .tsv). The user must
then click “Add to dataset list” to add it to the table
of samples.
After choosing a single file for uploading, user must wait until the
progress bar runs to the right end and says “Upload complete”. Sometimes
the progress bar runs to the end but it takes some time for the system
to finalize reading a large file.
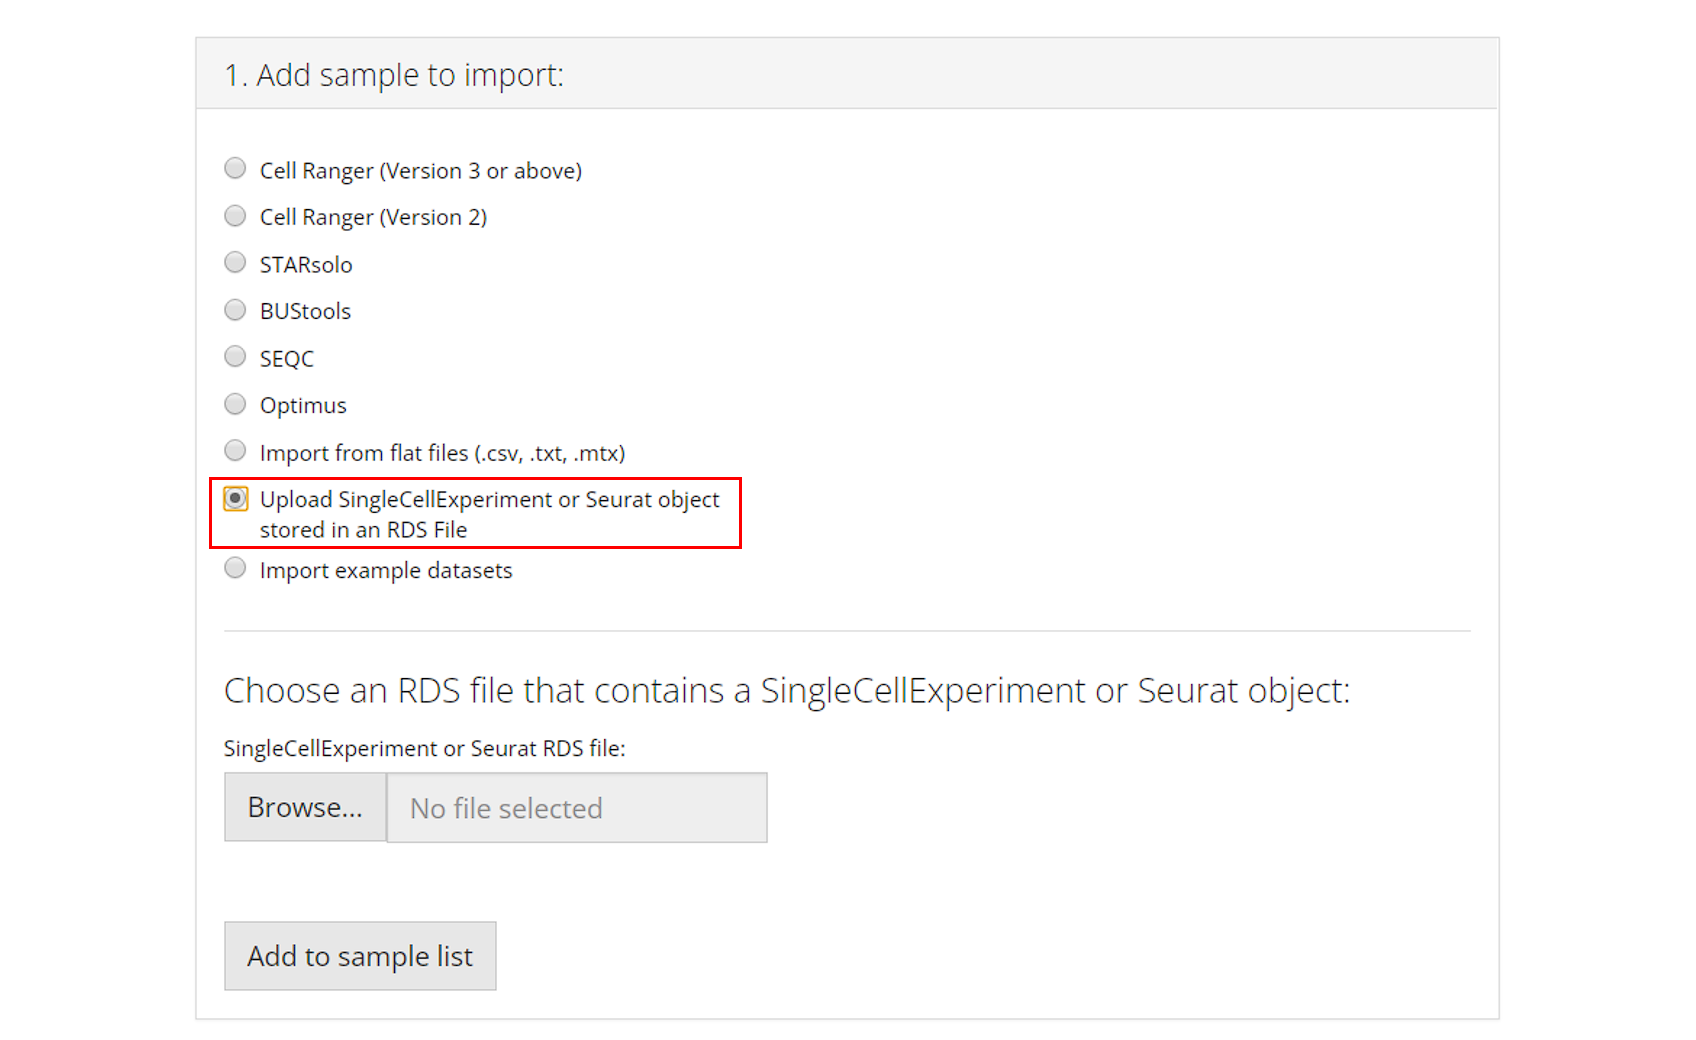
SingleCellExperiment or Seurat Object in an RDS file
RDS is a file format that stores a single object from R environment.
To import a single-cell dataset stored in a
SingleCellExperiment (SCE) object from an
RDS file, the user can simply select which RDS file to
import and click “Add to Sample List”.
After choosing a single file for uploading, user must wait until the
progress bar runs to the right end and says “Upload complete”. Sometimes
the progress bar runs to the end but it takes some time for the system
to finalize reading a large file.
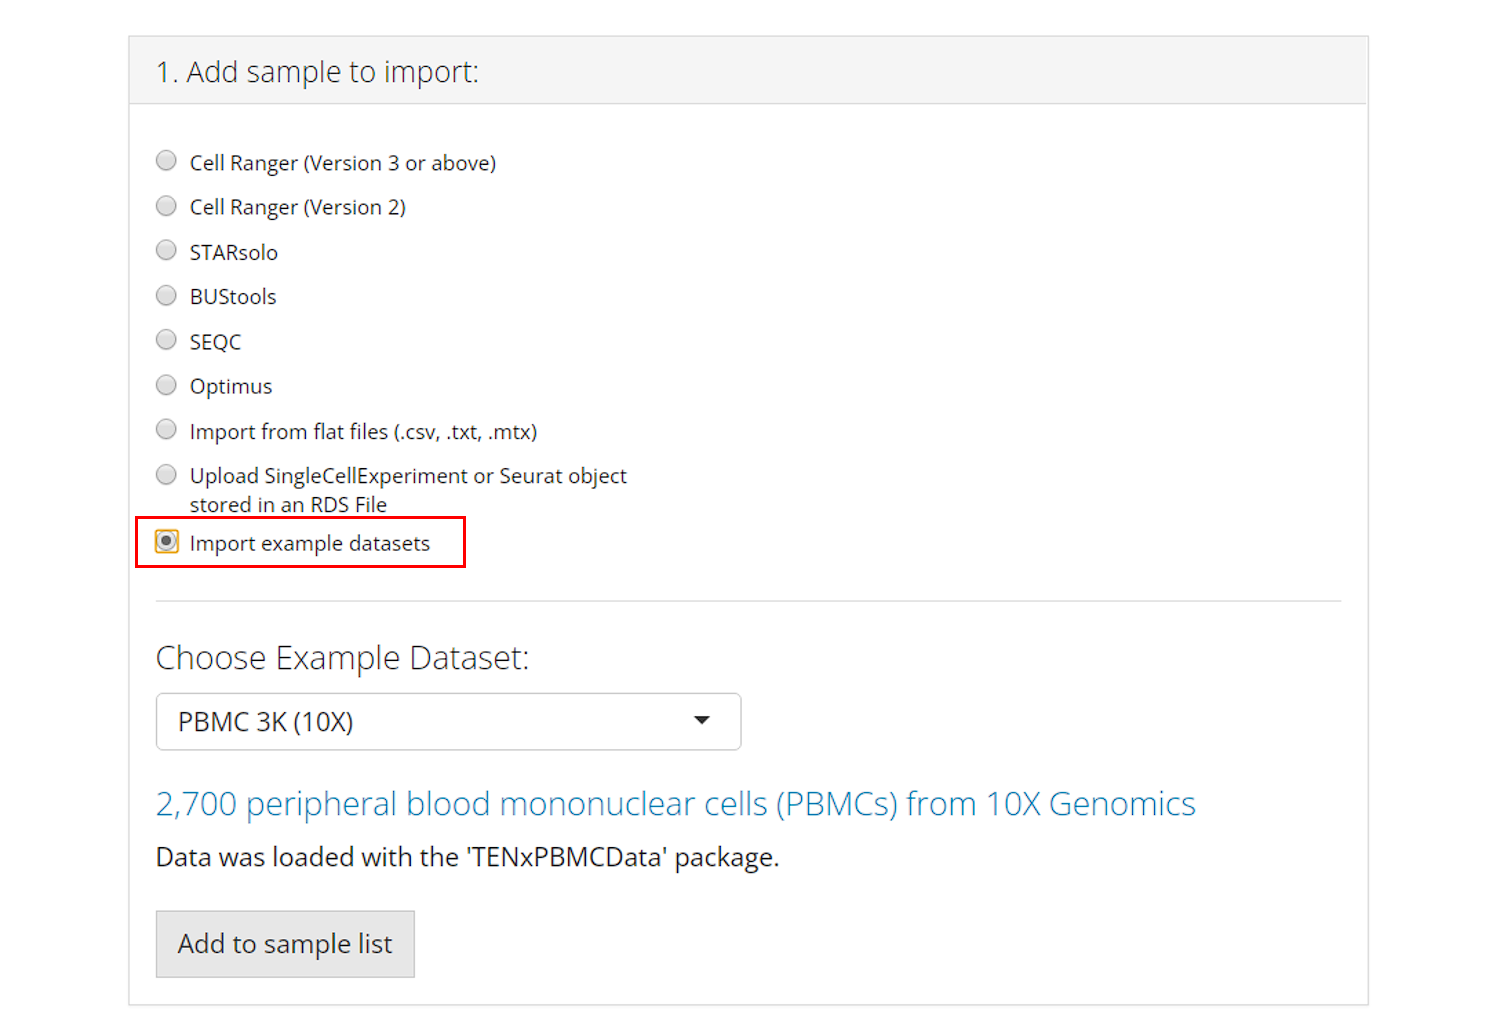
Example Datasets
Users can also opt to import and work with published example datasets. To do so, the user must select which dataset they would like to use from the dropdown menu and click “Add to Sample List”. For more information about the chosen dataset, users can click on the hyperlink of the title and open the reference website in a browser.
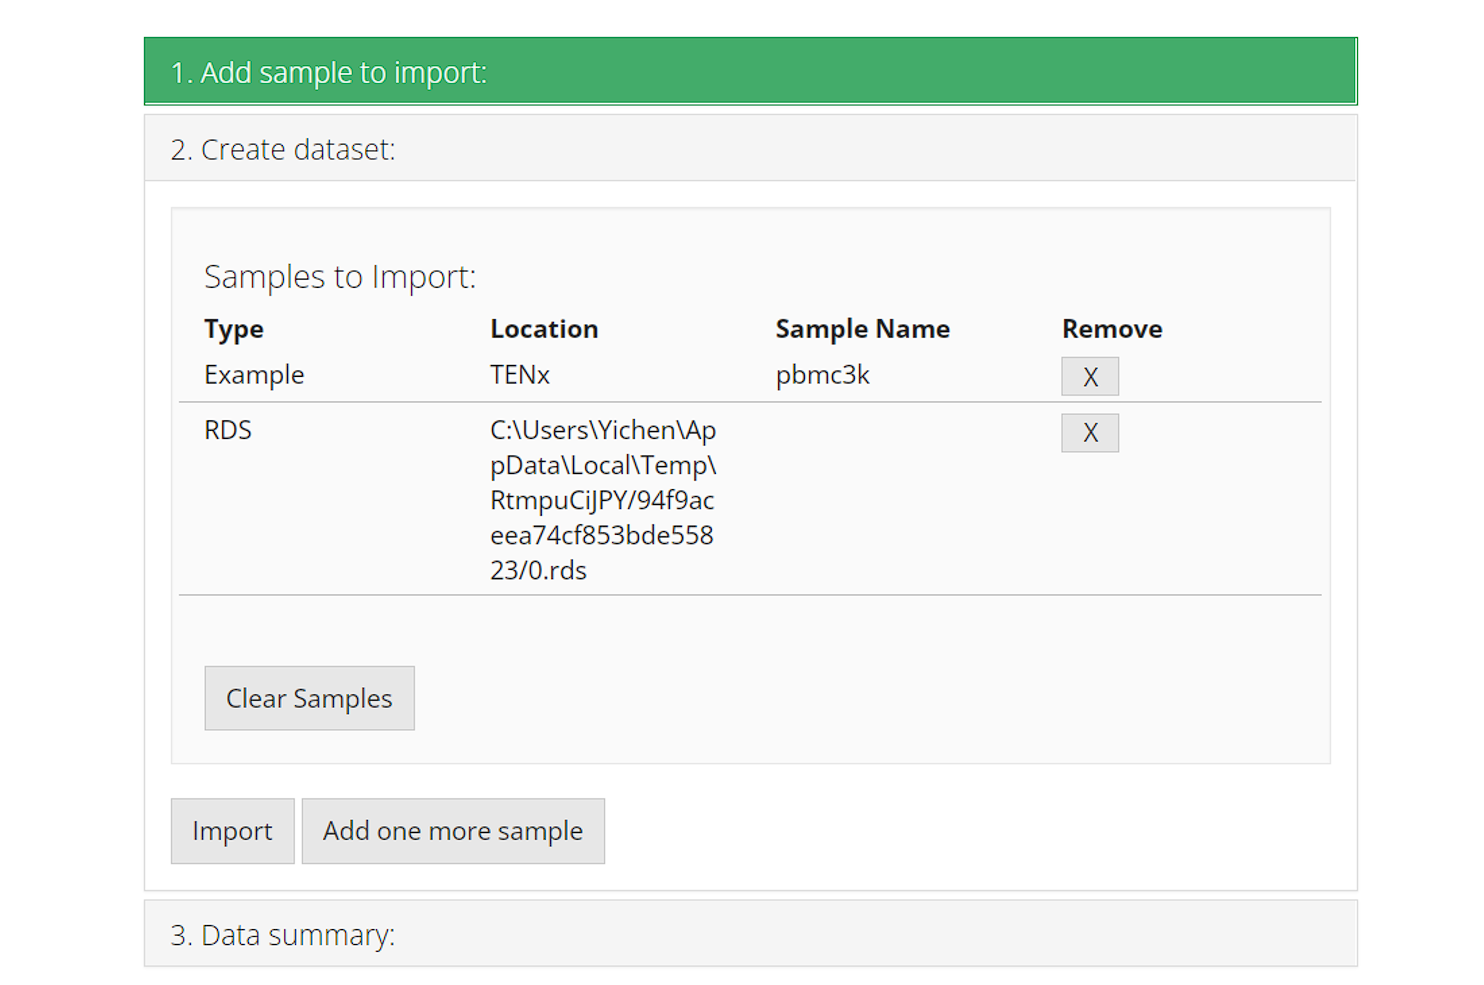
2. Create dataset
Each time users add a sample/dataset, the second collapse box “2. Create dataset” will automatically pop up and show the list of samples that are already added. Users can click on either the first collapse or the button “Add one more sample” to go back and add a new sample. At this point, the samples are just on a wait list but not imported yet.
The [X] button on the right of each row works for
removing the corresponding sample from the wait list, before finally
importing them. The button “Clear Sample” clears all
samples in the wait list, but do not interfere what has been
imported.
When ready, click on button “Import” to start importing.
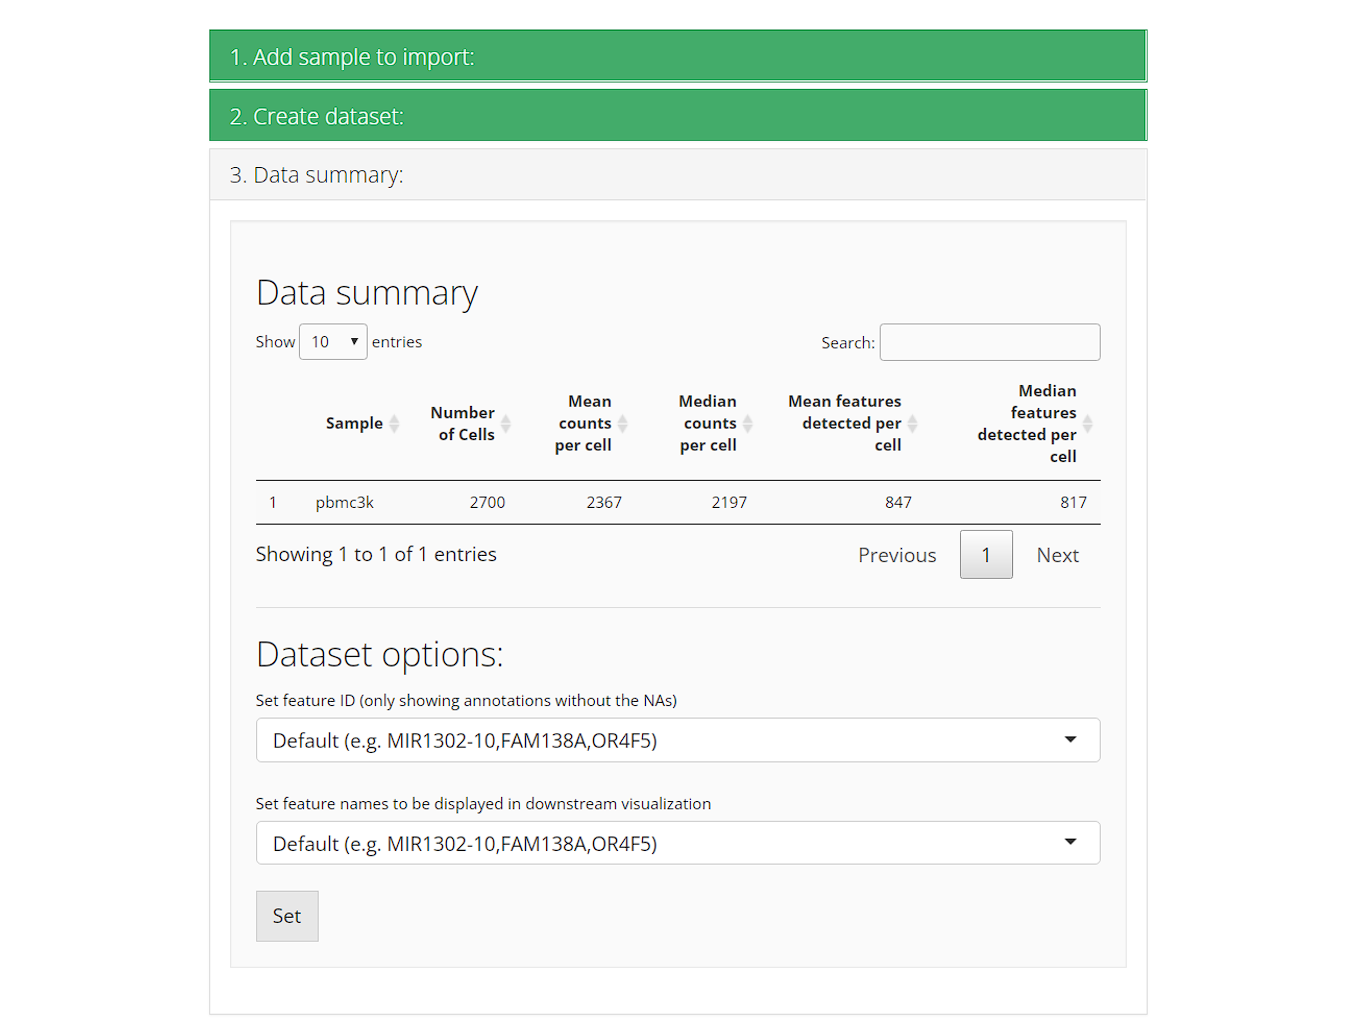
3. Data summary
Upon successfully importing all samples/datasets, the third collapse box “3. Data summary” will automatically pop up. There will be a summary table for the stats of each sample. and preset options for downstream analysis.
-
Set feature ID: The feature ID here refers to the
default feature identifiers. Usually this is what we see as the row
names of an expression matrix. Most of the cases has ensembl ID as their
default feature ID. Users can opt to change the ID type here, but are
limited to using unique non-NA variables in the feature metadata.
- Set feature names to be displayed in downstream visualization: While the feature ID in the previous setting is used for uniquely identify features during calculation, it might not be necessarily suitable for visualization. For example, ensembl ID is commonly seen as the unique identifier, but people hardly know what the gene/transcript is at a glance. Here SCTK provides an interface for setting feature name for visualization without modifying the unique identifier. Options still come from the feature metadata but are not limited. The setting here applies through out the whole UI.
SCTK provides wrapper functions that import data from the output of
all pre-processing tools mentioned at the top. A list of these import
functions will be followed. All the import functions return the imported
counts matrix as a SingleCellExperiment object assay, with
associated information in respective colData,
rowData, reducedDim, and metadata
fields.
Function Reference for pre-processing tools
| Upstream Tool | Function |
|---|---|
| Alevin | importAlevin() |
| BUStools | importBUStools() |
| CellRanger |
importCellRanger(),
importCellRangerV2(), importCellRangerV3(),
importCellRangerV2Sample(),
importCellRangerV3Sample()
|
| DropEst | importDropEst() |
| Optimus | importOptimus() |
| SEQC | importSEQC() |
| STARsolo | importSTARsolo() |
Click on the link of the function names to read the detailed manual of the them.
Function reference for importing Flat files (.csv, .tsv)
| File Format | Function |
|---|---|
| .mtx, .txt, .csv, .tab, or .tsv | importFromFiles() |
Click on the link of the function names to read the detailed manual of the them.
Function reference for importing an example
Run the following command to import the “PBMC-3K” dataset provided by TEN-X.
library(singleCellTK)
sce <- importExampleData("pbmc3k")
Click on the link of the function names to read the detailed manual of the it.
Importing from saved objects (SingleCellExperiment, Seurat, AnnData)
Run the following command to import a SingleCellExperiment object saved in RDS file
sce <- readRDS("path/to/filename.rds")Run the following commands to import a Seurat object saved in RDS file, and convert it to SingleCellExperiment object to be compatible with SCTK’s workflow.
seuratObj <- readRDS("path/to/filename.rds")
sce <- convertSeuratToSCE(seuratObj)
Run the following commands to import an AnnData object saved in H5AD file, and convert it to SingleCellExperiment object to be compatible with SCTK’s workflow.
sce <- importAnnData("path/to/filename.h5ad")Click on the link of the function names to read the detailed manual of the them.
When multiple datasets are imported and users would like to perform analysis of all the samples at the same time, users can use the following utility function to combine them
sce.list <- list(sampleName1 = sce1, sampleName2 = sce2)
sce.combined <- combineSCE(sce.list, by.r = NULL, by.c = NULL, combined = TRUE)